自定义属性与自定义 Style
我们一般会自定义一个View,比如 MyCustomView,然后再设置自定义属性:在 res/values 目录下,创建一个 attrs.xml ,在其中编写 declare-styleable :
1 |
|
这个过程有2点需要注意:
- declare-styleable 旁边的name属性,这个属性的取值对应所定义的类名。因为我们自定义的类名叫做 MyCustomView ,所以这里的name 取值也是 MyCustomView
- 自定义属性值可以组合使用,比如
表示既可以自定义 color 值(比如#ff0000),也可以利用 @color/xxx 来引用 color.xml 中已有的值
当然,我们有时候也需要使用常量来表示,比如上述的 flag,相当于代码中的常量,比如 young 就表示数字 18。
在xml中使用自定义属性
要记得以 xmlns 导入自定义的属性集:
xmlns:attrstest=”http://schemas.android.com/apk/res-auto"
在代码中获取自定义的属性主要使用 TypedArray
declare-styleable 标签其他属性的用法
暂略
测量与布局
ViewGroup 的绘制流程
View 和ViewGroup 基本相同,只不过ViewGroup 不仅要绘制自己,还要绘制其子控件,而View 只需要绘制自己即可,所以就以 ViewGroup 来讲解。
绘制流程分为 3 个步骤,测量(onMeasure)、布局(onLayout)、绘制(onDraw),需要注意的一点是:onMeasure 用于测量当前控件的大小,为正式布局提供建议(只是提供建议,至于用不用,需要看 onLayout 函数)。
onMeasure 函数与 MeasureSpec
测量过程通过 measure() 函数实现,是 View 树自顶向下的遍历,每个 View 在循环过程中将尺寸细节往下传递,当测量过程完成后,所有的 View 都存储了自己的尺寸。
并且,布局过程 layout 也是自顶向下实现的,在这个过程中,每个父 View 负责通过计算好的尺寸放置它的子 View。
onMeasure 函数
该函数有2个int类型的参数 widthMeasureSpec 和 heightMeasureSpec ,这两个参数都是父View传递过来给当前 View 的一个建议值。
MeasureSpec 组成
虽然上述参数是int 类型的,但是它们是由 mode + size 两部分组成的。它们转换成二进制后,前2位表示模式(mode),后30位表示数值(size)。模式主要有3种:
- UNSPECIFIED(mode位:00):父元素不对子元素施加任何约束,子元素可以得到任意想要的大小
- EXACTLY(mode位:01):父元素决定子元素的确切大小,子元素将被限定在给定的便捷里而忽略它本身大小
- AT_MOST(mode位:10):子元素至多能达到指定的大小值
由以上特性,我们就可以很简单地直到模式和数值的提取:MODE_MASK,它的二进制表示中,前2位是1,其余30位都是 0,这样,我们只需要将widthMeasureSpec (或 heightMeasureSpec) 位与(&) MODE_MASK 就可以得到 mode 值,将 他们 & ~MODE_MASK 即可得到数值。
mode 的用处
参数 widthMeasureSpec 和 heightMeasureSpec 各自都有对应的mode,而这个mode 来自 XML 定义,简单来说xml 布局和 mode 有如下关系:
- Wrap_content -> MeasureSpec.AT_MOST
- match_parent -> MeasureSpec.EXACTLY
- 具体值 -> MeasureSpec.EXACTLY
1 | <com.example.FlowLayout |
比如上述例子中,FlowLayout 在 onMeasure() 函数中传值时,widthMeasureSpec 的mode 是 MeasureSpec.EXACTLY ,即父窗口宽度值;heightMeasureSpec 的mode是 MeasureSpec.AT_MOST ,即值不确定。一定要注意的是:当模式是 MeasureSpec.EXACTLY 时,就不必设定我们计算的值了,因为这个大小是用户指定的,我们不应该改。但当模式是 MeasureSpec.AT_MOST 时,就需要将大小设定为我们计算的数值,因为用户使用的是 wrap_content,没有设置具体值。
1 | protected void onMeasure(int widthMeasureSpec,int heightMeasureSpec) { |
onLayout 函数
前面说了 ,onLayout 实现了所有子View的布局,注意,是所有子View。那它自己的布局怎么办?这个后续说。其实 onLayout 是个抽象函数,也就是所有继承 ViewGroup 的类都要自己去实现这个函数,LinearLayout 和 RelativeLayout 都是如此,均重写了。
简单示例(自己加的章节)
用一个简单示例说明 onMeasure 与 onLayout 的具体使用,比如要做如下效果图:
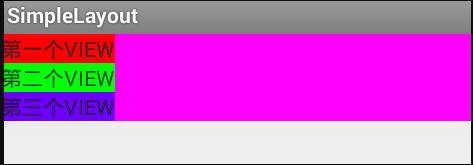
这个效果图需要关注2点:(1)、三个TextView 竖直排列 (2)、背景Layout宽度是 match_parent ,高度是 wrap_content 。首先看下布局文件:
1 | <com.example.myapplication.MyLinLayout xmlns:android="http://schemas.android.com/apk/res/android" |
自定义的 MyLinLayout 的宽高分别为 match_parent 和 wrap_content。
MyLinLayout 重写 onMeasure() 函数
前面提到 onMeasure 的作用就是根据 container 内部的子控件计算自己的宽和高 ,然后通过 setMeasuredDimension 方法设置进去。先看看完整的代码:
1 |
|
步骤如下:
- 获取从父类传过来的建议宽高,提取mode 和value
- 测量所有的子 View ,之后就能获取所有子View 的测量宽高
- 根据所有子View 的宽高,来获得自己的计算宽高,这个值计算的其实就是自己宽和高都被设置为 wrap_content 情况下的值,因为 Exactly 的时候,并不建议我们去改value 的。
- 因为是竖直排列,所以container 的高度应该是各个子View的高度和;宽度应该是各个子View 最大的宽度
- 最后,根据当前用户设置的mode来判断是否需要将这个计算宽高设置进去,用它来实现当前container 所在的位置
由于我们在上面的xml 布局文件中,将 MyLinLayout 的宽度设置为 match_parent ,高度为 wrap_content ,所以在onMeasure 里面,
int measureWidthMode 应该是MeasureSpec.EXACTLY; measureHeightMode 为 MeasureSpec.AT_MOST,换句话说,width 使用的是从父类传过来的 measureWidth ,高度是我们自己计算的 height,即实际情况应该等价于:
1 | setMeasuredDimension(measureWidth, height); |
MyLinLayout 重写 onLayout 函数
在这一部分是根据自己的医院把 container 内部的各个控件排列起来,先看完整代码:
1 |
|
代码讲完,再讲一个非常容易混淆的问题:
getMeasuredWidth 与 getWidth
这两个值大部分时候是相同的,但是含义根本不一样,二者区别主要体现在:
- getMeasuredWidth 函数在 measure 过程结束后就可以获取到宽度值,而getWidth 需要在 layout 完成后才能获取到高度值!
- getMeasuredWidth 获取的值是通过 setMeasuredDimension 函数来设置的;而 getWidth 函数值则是通过 layout(left,top,right,bottom) 函数来进行设置的
看完两个函数后,我们也明白了 onMeasure 阶段提供的测量结果只是为布局提供建议的,最终要看 onLayout 函数。因为我们在 child.layout 的时候,直接通过 0 + child.measuredWidth 来计算right 的值,所以我 getMeasuredWidth 与 getWidth 函数返回的值就是一样的了。
疑问:container 自己什么时候被布局
这其实要追溯到 View 的 layout 里面:
1 | public void layout(int l, int t, int r, int b) { |
setFrame 设置的是自己的位置,结束后才调用 onLayout 。此时,measure 和 layout 都结束了,但是我们还没考虑 margin。
获取子控件margin
如果要自定义 ViewGroup 支持子控件的 layout_margin 参数,则自定义的 ViewGroup 类必须重写 generateLayoutParams() 函数,并且在该函数返回一个 ViewGroup.MarginLayoutParams 派生类对象!
为了验证,我们可以在之前的 MyLinLayout 例子基础上,为 TextView 添加 margin ,但是我们能看到,压根就没有起作用,代码就先略了。这是为什么呢?因为测量和布局都是我们自己实现的,我们在 onLayout() 函数中没有根据 margin 来布局。
需要注意的是,如果我们在 onLayout() 函数中根据 margin 来布局,那么 onMeasure() 函数中计算 container 的大小时,也要加上 layout_margin 参数,否则导致 container 太小而控件显示不全。
实例展示
之前说的需要重写 generateLayoutParams() 函数,代码如下:
1 |
|
至于为什么要这么写,稍后再讲。
重写 onMeasure() 函数
略
实现 FlowLayout 容器
先略
当measure 完成之后,尺寸才会存到 View 属性中,我们才能获取到 View 的属性