一、前情回顾 早期的 XUtil 框架是使用运行期注解,采用的是反射 ,后续都比较倾向于编译器框架 APT 了,因为运行期反射还是有点消耗性能,目前采用编译期注解的框架有:Dagger2、Room、ARouter、Buterkife、DataBinding 等。
如果想学 APT 的使用,怎么自己生成代码,可以去看EventBus 中的注解处理器
二、使用 JavaPoet 但是上述EventBus 那种生成代码的方式有点 Low ,需要一行一行地写,从 import 写到最后一行,手抖写错一个标点符号就崩了。因此,我们可以看 ARouter 的,它里面使用了 JavaPoet 框架。但是传统方式看起来更直观,JavaPoet 看起来比较难。
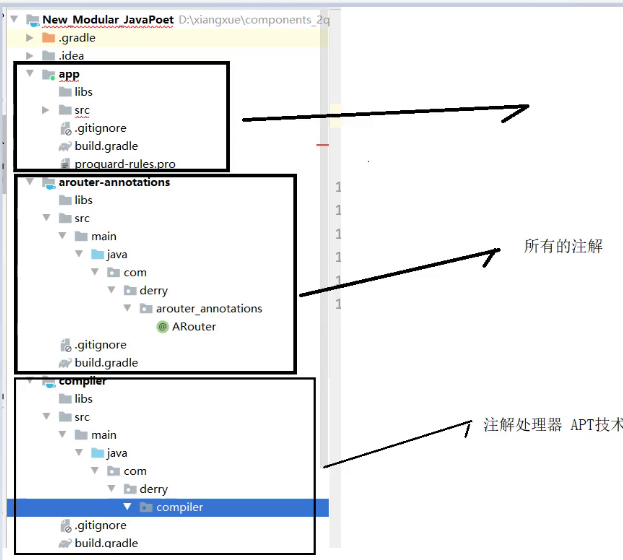
2.1 如何去使用APT 新建 Android工程,在其中 new 一个 Lib 出来,用于存放所有的注解代码,再new 一个Lib ,作为注解处理器,项目结构如下所示:
这样划分是为了能够隔离项目代码和 APT 代码。需要把compiler 变为一个服务,监听 项目中关注的注解,所以就需要google 的 autoservice 以及生成代码需要用 JavaPoet ,所以 compiler 这个 Module 的 build.gradle 的文件如下:
1
2
3
4
5
6
7
8
9
10
11
12
13
14
15
16
17
18
19
20
21
22
apply plugin: 'java-library' dependencies { implementation fileTree(dir: 'libs' , include: ['*.jar' ]) compileOnly'com.google.auto.service:auto-service:1.0-rc4' annotationProcessor'com.google.auto.service:auto-service:1.0-rc4' implementation "com.squareup:javapoet:1.9.0" implementation project(":arouter-annotations" ) } sourceCompatibility = "1.7" targetCompatibility = "1.7"
我们的项目也需要依赖我们的注解工程,所以需要在其 build.gradle 中添加注解和注解处理器的依赖,以及一些参数的传递,所以代码是这样的:
1
2
3
4
5
6
7
8
9
10
11
12
13
14
15
16
17
18
19
20
21
22
23
24
25
26
27
28
29
30
31
32
33
34
35
36
37
38
39
40
41
42
43
44
45
46
47
apply plugin: 'com.android.application' android { compileSdkVersion 30 buildToolsVersion "30.0.1" defaultConfig { applicationId "com.derry.new_modular_javapoet" minSdkVersion 16 targetSdkVersion 30 versionCode 1 versionName "1.0" testInstrumentationRunner "androidx.test.runner.AndroidJUnitRunner" javaCompileOptions { annotationProcessorOptions { arguments = [student: 'hello ni hao student javapoet' ] } } } buildTypes { release { minifyEnabled false proguardFiles getDefaultProguardFile('proguard-android-optimize.txt' ), 'proguard-rules.pro' } } } dependencies { implementation fileTree(dir: "libs" , include: ["*.jar" ]) implementation 'androidx.appcompat:appcompat:1.2.0' implementation 'androidx.constraintlayout:constraintlayout:2.0.4' implementation project(path: ':arouter-annotations' ) implementation project(path: ':arouter-annotations' ) testImplementation 'junit:junit:4.12' androidTestImplementation 'androidx.test.ext:junit:1.1.2' androidTestImplementation 'androidx.test.espresso:espresso-core:3.3.0' implementation project(":arouter-annotations" ) annotationProcessor project(":compiler" ) }
接下来就是写compiler 这个 module 中的代码里,它是真正的处理器:
1
2
3
4
5
6
7
8
9
10
11
12
13
14
15
16
17
18
19
20
21
22
23
24
25
26
27
28
29
30
31
32
33
34
35
36
37
38
39
40
41
42
43
44
45
46
47
48
49
50
51
52
53
54
55
56
57
58
59
60
61
62
63
64
65
66
67
68
69
70
71
72
73
74
75
76
77
78
79
80
81
82
83
84
85
86
87
88
89
90
91
92
93
94
95
96
97
98
99
100
101
102
103
104
105
106
107
108
109
110
111
112
113
114
115
116
117
118
119
120
121
122
123
124
125
126
127
128
129
130
131
132
133
134
135
136
137
138
139
140
141
142
143
144
145
146
147
148
149
150
151
152
153
154
155
156
157
158
159
160
161
162
163
164
165
166
167
168
169
170
171
172
173
174
175
176
177
178
179
180
181
182
183
package com.derry.compiler;import com.derry.arouter_annotations.ARouter;import com.google.auto.service.AutoService;import com.squareup.javapoet.ClassName;import com.squareup.javapoet.JavaFile;import com.squareup.javapoet.MethodSpec;import com.squareup.javapoet.TypeSpec;import java.io.IOException;import java.lang.reflect.Type;import java.util.Set;import javax.annotation.processing.AbstractProcessor;import javax.annotation.processing.Filer;import javax.annotation.processing.Messager;import javax.annotation.processing.ProcessingEnvironment;import javax.annotation.processing.Processor;import javax.annotation.processing.RoundEnvironment;import javax.annotation.processing.SupportedAnnotationTypes;import javax.annotation.processing.SupportedOptions;import javax.annotation.processing.SupportedSourceVersion;import javax.lang.model.SourceVersion;import javax.lang.model.element.Element;import javax.lang.model.element.Modifier;import javax.lang.model.element.TypeElement;import javax.lang.model.util.Elements;import javax.lang.model.util.Types;import javax.tools.Diagnostic;@AutoService(Processor.class) @SupportedAnnotationTypes({"com.derry.arouter_annotations.ARouter"}) @SupportedSourceVersion(SourceVersion.RELEASE_7) @SupportedOptions("student") public class ARouterProcessor extends AbstractProcessor private Elements elementTool; private Types typeTool; private Messager messager; private Filer filer; @Override public synchronized void init (ProcessingEnvironment processingEnvironment) super .init(processingEnvironment); elementTool = processingEnvironment.getElementUtils(); messager = processingEnvironment.getMessager(); filer = processingEnvironment.getFiler(); String value = processingEnvironment.getOptions().get("student" ); messager.printMessage(Diagnostic.Kind.NOTE, ">>>>>>>>>>>>>>>>>>>>>>" +value); } @Override public boolean process (Set<? extends TypeElement> set, RoundEnvironment roundEnvironment) messager.printMessage(Diagnostic.Kind.NOTE, ">>>>>>> Derry run..." ); if (set.isEmpty()) { return false ; } Set<? extends Element> elements = roundEnvironment.getElementsAnnotatedWith(ARouter.class); for (Element element : elements) { String packageName = elementTool.getPackageOf(element).getQualifiedName().toString(); String className = element.getSimpleName().toString(); messager.printMessage(Diagnostic.Kind.NOTE, "被@ARetuer注解的类有:" + className); String finalClassName = className + "$$$$$$$$$ARouter" ; ARouter aRouter = element.getAnnotation(ARouter.class); MethodSpec findTargetClass = MethodSpec.methodBuilder("findTargetClass" ) .addModifiers(Modifier.PUBLIC, Modifier.STATIC) .returns(Class.class) .addParameter(String.class, "path" ) .addStatement("return path.equals($S) ? $T.class : null" , aRouter.path(), ClassName.get((TypeElement) element)) .build(); TypeSpec myClass = TypeSpec.classBuilder(finalClassName) .addMethod(findTargetClass) .addModifiers(Modifier.PUBLIC) .build(); JavaFile packagef = JavaFile.builder(packageName, myClass).build(); try { packagef.writeTo(filer); } catch (IOException e) { e.printStackTrace(); messager.printMessage(Diagnostic.Kind.NOTE, "生成" + finalClassName + "文件时失败,异常:" + e.getMessage()); } } return true ; } }
在编译的时候,如果要从 Android 端传入参数到 APT 中来的话,怎么操作呢?因为这 2 者肯定是不能直接通信的,我们可以从 gradle 中来中转,在应用module 的 build.gradle 中采用 javaCompileOptions 来解决:
1 2 3 4 5 6 javaCompileOptions { annotationProcessorOptions { arguments = [student: 'hello ni hao student javapoet' ] } }
在 APT 中接收这个参数,就在 APT 代码上面加上注解:
1 2 @SupportedOptions("student")
三、JavaPoet高级用法 最后,如果要在 Android 中使用这个注解处理器,还需要在 Android 工程中的 build.gradle 中依赖它,加上之前加入的依赖注解代码,就是这样的:
1 2 3 4 5 implementation project(":arouter-annotations" ) annotationProcessor project(":compiler" )
所以,这个 annotationProcessor 声明 是要注意的。
javapoet 主要需要注意的是步骤:
生成方法
生成类
生成包
老师说这个可以去讲一下:EventBus 使用的是普通的写的方式,所以很困难,整个类就是一个字符串,写得非常难。但是 ARouter 使用 javapoet 使用就很简单。
四、路由分组设计 很多开源框架的注解设计是这种思想:
在 compiler 这个 Module 中是正儿八经的注解处理器
在 xx_annotation 这个目录下写我们的注解(比如 ARouter 中这里就写 ARouter 这个注解类,并标明这个注解是修饰类,编译时注解)
xx_api 这个目录写的是注解相关的逻辑(用于与业务逻辑区分,比如 ARouter 中是ARouterGroup、ARouterPath 类,以及将 Activity 等放入相应的 Map 等逻辑)

