0%

番外篇主要是看到一篇简书上的博客后,对LauncherMode的一点补充。本文只是复制这篇博客的内容,防止这篇文章被简书屏蔽(因为他有一篇文章就已经是一直审核状态了)。

前言

我们知道Activity的start是走到Instrumentation的execStartActivity方法中,而这里是调用了ActivityManagerNative的getDefault方法 来获得一个ActivityManagerService(以下简称AMS)的远程代理对象,要走到AMS的startActivity方法。

1
2
3
4
5
6
int result = ActivityManagerNative.getDefault()
.startActivity(whoThread, who.getBasePackageName(), intent,
intent.resolveTypeIfNeeded(who.getContentResolver()),
token, target != null ? target.mEmbeddedID : null,
requestCode, 0, null, null, options);
checkStartActivityResult(result, intent);

这里先解释一下startActivity方法里的一些参数:

参数 作用
whoThread IApplicationThread的binder对象 用于AMS进行进程间通信
who 上下文对象 其实就是Activity
intent 目标intent
intent.resolveTypeIfneed 若没有在Manifest文件里面注明Activity的mime类型,返回null
token Binder对象 通过它可以获得Activity的相关信息 后边会保存到sourceRecord这个对象里面
target 我们调用的Activity
requestCode 若没有设置结果就是小于0
0 flags
ProfilerInfo null
options 是一个bunder对象,记录用intent传递的信息

这里对应着AMS 中startactivity的参数

1
2
3
4
5
6
7
8
9
10
11
12
13
14
15
16
17
18
19
20
@Override
public final int startActivity(IApplicationThread caller, String callingPackage,
Intent intent, String resolvedType, IBinder resultTo, String resultWho, int requestCode,
int startFlags, ProfilerInfo profilerInfo, Bundle options) {
return startActivityAsUser(caller, callingPackage, intent, resolvedType, resultTo,
resultWho, requestCode, startFlags, profilerInfo, options,
UserHandle.getCallingUserId());
}
@Override
public final int startActivityAsUser(IApplicationThread caller, String callingPackage,
Intent intent, String resolvedType, IBinder resultTo, String resultWho, int requestCode,
int startFlags, ProfilerInfo profilerInfo, Bundle options, int userId) {
enforceNotIsolatedCaller("startActivity");
userId = handleIncomingUser(Binder.getCallingPid(), Binder.getCallingUid(), userId,
false, ALLOW_FULL_ONLY, "startActivity", null);
// TODO: Switch to user app stacks here.
return mStackSupervisor.startActivityMayWait(caller, -1, callingPackage, intent,
resolvedType, null, null, resultTo, resultWho, requestCode, startFlags,
profilerInfo, null, null, options, userId, null, null);
}

然后会调用ActivityStackSupervisor的startActivityMayWait方法,而ActivityStackSupervisor 就是专门管理activity的堆栈的类

startActivityMayWait方法

这里会先解析我们的intent来获取信息,通过调用函数resoleActivity方法获取ActivityInfo,这里主要是activity在AndroidManifest.xml里的信息

再往下看,进入到startActivityLocked 方法中

startActivityMayWait方法

另提一下activity 在 AMS 中的形式是 ActivityRecord,task 在 AMS 中的形式为TaskRecord,进程在 AMS 中的管理形式为 ProcessRecord

我们发现这里有两个ActivityRecord对象 有sourceRecord 和resultRecord

sourceRecord 代表的是最开始的activity
这就是通过resultTo这个binder对象获得Mainactivity的相关信息然后保存到这个对象中
resultRecord 代表的是接受启动结果的Activity
因为requestcode==-1 所以这里resultRecord==null

final int launchFlags = intent.getFlags();
这里获取Intent的启动Flag 就是我们在Intent.setFlag里面设置的标志
这个函数的主要作用就是处理sourceRecord和resultRecord两个对象
在这里sourceRecord和resultRecord指向的应该是同一个activity

然后调用startActivityUncheckedLocked来处理本次的启动Activity的请求

startActivityUncheckedLocked方法

startActivityUncheckedLocked方法

从这里我们可以看到 获取了activity的launchModel ,也就是对launchModel的判断处理应该是在这里
这里先判断是否FLAG_ACTIVITY_NEW_DOCUMENT,这个平时用的比较少,在android5.0上主要是决定你的task和activity是如何展现在overview screen 中的,详细请看Android 5.0 Overview Screen–总览画面
再往下看

startActivityUncheckedLocked方法

startFlags == 0 所以此时不会进入这个判断,没有设置这个FLAG_ACTIVITY_PREVIOUS_IS_TOP,所以我们的notTop==null
接着 系统默认addingToTask= false 默认是开启新的Task,从后面的判断也可以看出来

startActivityUncheckedLocked方法

之前说过 sourceRecord就是最开始的activity 所以它不会为null,这样就到了else 中 inTask = null;

startActivityUncheckedLocked方法

在这里判断了启动模式,判断当前activity的启动模式和要启动的activity的启动模式,根据相应的启动模式设置launchFlags

startActivityUncheckedLocked方法

startActivityUncheckedLocked方法

这里目的是判断启动的activity是否在堆栈里存在,如果存在就直接在进行相应的操作
在文章开头 resultRecord 默认为null而且requestCode假如没有设置的话,requestCode小于0,所以resultRecord没有被赋值,所以我们构造ActivityRecord 时传入的是null,也就是可以进入这个if判断里
再往里看

startActivityUncheckedLocked方法

这里会判断启动的activity是否是SingleInstance,根据此进入不同的方法,目的是找到activity,如果有就返回,如果没有就返回null,先来看findTaskLocked方法

findTaskLocked方法

stack里的findTaskLocked方法比较长,顶部activity,如果没有就返回null,从注释上来看就是返回堆栈里的activity,简单说一下就是返回发起请求的activity,也是这个函数返回的activity

1
2
3
4
5
6
7
8
9
10
11
12
13
14
15
16
17
18
19
20
21
22
23
24
25
26
27
28
29
30
31
32
33
34
35
36
37
38
39
40
41
42
43
44
45
46
47
48
49
50
51
52
53
54
55
56
57
58
59
60
61
62
63
64
65
66
67
68
69
70
71
72
73
74
75
76
77
78
79
80
81
82
    /**
* Returns the top activity in any existing task matching the given
* Intent. Returns null if no such task is found.
*/
ActivityRecord findTaskLocked(ActivityRecord target) {
Intent intent = target.intent;
ActivityInfo info = target.info;
ComponentName cls = intent.getComponent();
if (info.targetActivity != null) {
cls = new ComponentName(info.packageName, info.targetActivity);
}
final int userId = UserHandle.getUserId(info.applicationInfo.uid);
boolean isDocument = intent != null & intent.isDocument();
// If documentData is non-null then it must match the existing task data.
Uri documentData = isDocument ? intent.getData() : null;

if (DEBUG_TASKS) Slog.d(TAG, "Looking for task of " + target + " in " + this);
for (int taskNdx = mTaskHistory.size() - 1; taskNdx >= 0; --taskNdx) {
final TaskRecord task = mTaskHistory.get(taskNdx);
if (task.voiceSession != null) {
// We never match voice sessions; those always run independently.
if (DEBUG_TASKS) Slog.d(TAG, "Skipping " + task + ": voice session");
continue;
}
if (task.userId != userId) {
// Looking for a different task.
if (DEBUG_TASKS) Slog.d(TAG, "Skipping " + task + ": different user");
continue;
}
final ActivityRecord r = task.getTopActivity();
if (r == null || r.finishing || r.userId != userId ||
r.launchMode == ActivityInfo.LAUNCH_SINGLE_INSTANCE) {
if (DEBUG_TASKS) Slog.d(TAG, "Skipping " + task + ": mismatch root " + r);
continue;
}

final Intent taskIntent = task.intent;
final Intent affinityIntent = task.affinityIntent;
final boolean taskIsDocument;
final Uri taskDocumentData;
if (taskIntent != null && taskIntent.isDocument()) {
taskIsDocument = true;
taskDocumentData = taskIntent.getData();
} else if (affinityIntent != null && affinityIntent.isDocument()) {
taskIsDocument = true;
taskDocumentData = affinityIntent.getData();
} else {
taskIsDocument = false;
taskDocumentData = null;
}

if (DEBUG_TASKS) Slog.d(TAG, "Comparing existing cls="
+ taskIntent.getComponent().flattenToShortString()
+ "/aff=" + r.task.rootAffinity + " to new cls="
+ intent.getComponent().flattenToShortString() + "/aff=" + info.taskAffinity);
if (!isDocument && !taskIsDocument && task.rootAffinity != null) {
if (task.rootAffinity.equals(target.taskAffinity)) {
if (DEBUG_TASKS) Slog.d(TAG, "Found matching affinity!");
return r;
}
} else if (taskIntent != null && taskIntent.getComponent() != null &&
taskIntent.getComponent().compareTo(cls) == 0 &&
Objects.equals(documentData, taskDocumentData)) {
if (DEBUG_TASKS) Slog.d(TAG, "Found matching class!");
//dump();
if (DEBUG_TASKS) Slog.d(TAG, "For Intent " + intent + " bringing to top: "
+ r.intent);
return r;
} else if (affinityIntent != null && affinityIntent.getComponent() != null &&
affinityIntent.getComponent().compareTo(cls) == 0 &&
Objects.equals(documentData, taskDocumentData)) {
if (DEBUG_TASKS) Slog.d(TAG, "Found matching class!");
//dump();
if (DEBUG_TASKS) Slog.d(TAG, "For Intent " + intent + " bringing to top: "
+ r.intent);
return r;
} else if (DEBUG_TASKS) {
Slog.d(TAG, "Not a match: " + task);
}
}
return null;
}

这里简单说一下,先是从mTaskHistory中遍历得到一个任务Task,并根据userid找到当前的task ,找到这个任务的顶部activity,并且保证它启动模式不是singleInstance,都满足了返回以下条件的activity

再回到刚才的方法往下看

这里先去activitystack里的moveToFront()方法

1
2
3
4
5
6
7
8
9
10
11
12
13
14
15
16
17
18
19
20
21
22
23
24
25
26
27
28
29
30
31
32
33
34
35
36
37
38
39
40
41
42
43
44
45
46
47
48
49
50
51
52
53
54
55
56
57
58
59
60
61
62
63
64
65
66
67
68
69
70
71
72
73
74
75
76
77
78
79
80
81
82
83
84
85
86
87
88
89
90
91
92
93
94
95
96
97
98
99
100
101
102
103
104
105
106
107
// If the caller has requested that the target task be
// reset, then do so.
if ((launchFlags&Intent.FLAG_ACTIVITY_RESET_TASK_IF_NEEDED) != 0) {
intentActivity = targetStack.resetTaskIfNeededLocked(intentActivity, r);
}
if ((startFlags&ActivityManager.START_FLAG_ONLY_IF_NEEDED) != 0) {
// We don't need to start a new activity, and
// the client said not to do anything if that
// is the case, so this is it! And for paranoia, make
// sure we have correctly resumed the top activity.
if (doResume) {
resumeTopActivitiesLocked(targetStack, null, options);
} else {
ActivityOptions.abort(options);
}
return ActivityManager.START_RETURN_INTENT_TO_CALLER;
}
if ((launchFlags &
(Intent.FLAG_ACTIVITY_NEW_TASK|Intent.FLAG_ACTIVITY_CLEAR_TASK))
== (Intent.FLAG_ACTIVITY_NEW_TASK|Intent.FLAG_ACTIVITY_CLEAR_TASK)) {
// The caller has requested to completely replace any
// existing task with its new activity. Well that should
// not be too hard...
reuseTask = intentActivity.task;
reuseTask.performClearTaskLocked();
reuseTask.setIntent(r);
} else if ((launchFlags&Intent.FLAG_ACTIVITY_CLEAR_TOP) != 0
|| launchSingleInstance || launchSingleTask) {
// In this situation we want to remove all activities
// from the task up to the one being started. In most
// cases this means we are resetting the task to its
// initial state.
ActivityRecord top =
intentActivity.task.performClearTaskLocked(r, launchFlags);
if (top != null) {
if (top.frontOfTask) {
// Activity aliases may mean we use different
// intents for the top activity, so make sure
// the task now has the identity of the new
// intent.
top.task.setIntent(r);
}
ActivityStack.logStartActivity(EventLogTags.AM_NEW_INTENT,
r, top.task);
top.deliverNewIntentLocked(callingUid, r.intent);
} else {
// A special case: we need to
// start the activity because it is not currently
// running, and the caller has asked to clear the
// current task to have this activity at the top.
addingToTask = true;
// Now pretend like this activity is being started
// by the top of its task, so it is put in the
// right place.
sourceRecord = intentActivity;
}
} else if (r.realActivity.equals(intentActivity.task.realActivity)) {
// In this case the top activity on the task is the
// same as the one being launched, so we take that
// as a request to bring the task to the foreground.
// If the top activity in the task is the root
// activity, deliver this new intent to it if it
// desires.
if (((launchFlags&Intent.FLAG_ACTIVITY_SINGLE_TOP) != 0 || launchSingleTop)
&& intentActivity.realActivity.equals(r.realActivity)) {
ActivityStack.logStartActivity(EventLogTags.AM_NEW_INTENT, r,
intentActivity.task);
if (intentActivity.frontOfTask) {
intentActivity.task.setIntent(r);
}
intentActivity.deliverNewIntentLocked(callingUid, r.intent);
} else if (!r.intent.filterEquals(intentActivity.task.intent)) {
// In this case we are launching the root activity
// of the task, but with a different intent. We
// should start a new instance on top.
addingToTask = true;
sourceRecord = intentActivity;
}
} else if ((launchFlags&Intent.FLAG_ACTIVITY_RESET_TASK_IF_NEEDED) == 0) {
// In this case an activity is being launched in to an
// existing task, without resetting that task. This
// is typically the situation of launching an activity
// from a notification or shortcut. We want to place
// the new activity on top of the current task.
addingToTask = true;
sourceRecord = intentActivity;
} else if (!intentActivity.task.rootWasReset) {
// In this case we are launching in to an existing task
// that has not yet been started from its front door.
// The current task has been brought to the front.
// Ideally, we'd probably like to place this new task
// at the bottom of its stack, but that's a little hard
// to do with the current organization of the code so
// for now we'll just drop it.
intentActivity.task.setIntent(r);
}
if (!addingToTask && reuseTask == null) {
// We didn't do anything... but it was needed (a.k.a., client
// don't use that intent!) And for paranoia, make
// sure we have correctly resumed the top activity.
if (doResume) {
targetStack.resumeTopActivityLocked(null, options);
} else {
ActivityOptions.abort(options);
}
return ActivityManager.START_TASK_TO_FRONT;
}

这里主要看

代码片段

这里走到了ActivityStack的performClearTaskLocked方法里

1
2
3
4
5
6
7
8
9
10
11
12
13
14
15
16
17
18
19
20
21
22
23
24
25
26
27
28
29
30
31
32
33
34
35
36
37
38
39
40
41
42
43
44
45
46
47
48
49
50
51
52
53
54
55
56
/**
* Perform clear operation as requested by
* {@link Intent#FLAG_ACTIVITY_CLEAR_TOP}: search from the top of the
* stack to the given task, then look for
* an instance of that activity in the stack and, if found, finish all
* activities on top of it and return the instance.
*
* @param newR Description of the new activity being started.
* @return Returns the old activity that should be continued to be used,
* or null if none was found.
*/
final ActivityRecord performClearTaskLocked(ActivityRecord newR, int launchFlags) {
int numActivities = mActivities.size();
for (int activityNdx = numActivities - 1; activityNdx >= 0; --activityNdx) {
ActivityRecord r = mActivities.get(activityNdx);
if (r.finishing) {
continue;
}
if (r.realActivity.equals(newR.realActivity)) {
// Here it is! Now finish everything in front...
final ActivityRecord ret = r;

for (++activityNdx; activityNdx < numActivities; ++activityNdx) {
r = mActivities.get(activityNdx);
if (r.finishing) {
continue;
}
ActivityOptions opts = r.takeOptionsLocked();
if (opts != null) {
ret.updateOptionsLocked(opts);
}
if (stack.finishActivityLocked(r, Activity.RESULT_CANCELED, null, "clear",
false)) {
--activityNdx;
--numActivities;
}
}

// Finally, if this is a normal launch mode (that is, not
// expecting onNewIntent()), then we will finish the current
// instance of the activity so a new fresh one can be started.
if (ret.launchMode == ActivityInfo.LAUNCH_MULTIPLE
&& (launchFlags & Intent.FLAG_ACTIVITY_SINGLE_TOP) == 0) {
if (!ret.finishing) {
stack.finishActivityLocked(ret, Activity.RESULT_CANCELED, null,
"clear", false);
return null;
}
}

return ret;
}
}

return null;
}

这里就是根据ID找到等于参数taskId的任务,然后在这个任务中查找是否已经存在即将要启动的Activity的实例,如果存在,就会把这个Actvity实例上面直到任务堆栈顶端的Activity通过调用finishActivityLocked函数将它们结束掉。

在这里便引出了manifest文件中的一个重要属性,taskAffinity。在官方文档中可以得到关于taskAffinity的以下信息

  • taskAffinity表示当前activity具有亲和力的一个任务(原句为The task that the activity has an affinity for.),大致可以这样理解,这个 taskAffinity表示一个任务,这个任务就是当前activity所在的任务。

在概念上,具有相同的affinity的activity(即设置了相同taskAffinity属性的activity)属于同一个任务。

  • 一个任务的affinity决定于这个任务的根activity(root activity)的taskAffinity。
  • 这个属性决定两件事:当activity被re-parent时,它可以被re-paren哪个任务中;当activity以FLAG_ACTIVITY_NEW_TASK标志启动时,它会被启动到哪个任务中。(这个比较 难以理解,请结合中的属性allowTaskReparenting和Intent中的标志 FLAG_ACTIVITY_NEW_TASK加以理解)
  • 默认情况下,一个应用中的所有activity具有相同的taskAffinity,即应用程序的包名。我们可以通过设置不同的taskAffinity属性给应用中的activity分组,也可以把不同的 应用中的activity的taskAffinity设置成相同的值。
    为一个activity的taskAffinity设置一个空字符串,表明这个activity不属于任何task。
    回到前面的startActivityUncheckedLocked函数中,这里的变量top就为null了,于是执行下面的else语句

代码片段

所以 此时将addintToTask=true 并且sourceRecord = 我们的activity,再往下看

1
2
3
4
5
6
7
8
9
10
11
12
13
14
15
16
17
18
19
20
21
22
23
24
25
26
27
28
29
30
31
32
33
34
35
36
37
38
39
40
41
if (r.packageName != null) {
// If the activity being launched is the same as the one currently
// at the top, then we need to check if it should only be launched
// once.
ActivityStack topStack = getFocusedStack();
ActivityRecord top = topStack.topRunningNonDelayedActivityLocked(notTop);
if (top != null && r.resultTo == null) {
if (top.realActivity.equals(r.realActivity) && top.userId == r.userId) {
if (top.app != null && top.app.thread != null) {
if ((launchFlags & Intent.FLAG_ACTIVITY_SINGLE_TOP) != 0
|| launchSingleTop || launchSingleTask) {
ActivityStack.logStartActivity(EventLogTags.AM_NEW_INTENT, top,
top.task);
// For paranoia, make sure we have correctly
// resumed the top activity.
topStack.mLastPausedActivity = null;
if (doResume) {
resumeTopActivitiesLocked();
}
ActivityOptions.abort(options);
if ((startFlags&ActivityManager.START_FLAG_ONLY_IF_NEEDED) != 0) {
// We don't need to start a new activity, and
// the client said not to do anything if that
// is the case, so this is it!
return ActivityManager.START_RETURN_INTENT_TO_CALLER;
}
top.deliverNewIntentLocked(callingUid, r.intent);
return ActivityManager.START_DELIVERED_TO_TOP;
}
}
}
}

} else {
if (r.resultTo != null) {
r.resultTo.task.stack.sendActivityResultLocked(-1, r.resultTo, r.resultWho,
r.requestCode, Activity.RESULT_CANCELED, null);
}
ActivityOptions.abort(options);
return ActivityManager.START_CLASS_NOT_FOUND;
}

根据注释我们能看出这个方法是检查当前任务的顶端是否是我们要启动的activity,接着往下看,便是启动activity

1
2
3
4
5
6
7
8
9
10
11
12
13
14
15
16
17
18
19
20
21
22
23
24
25
26
27
28
29
30
31
32
33
34
35
36
37
38
39
40
41
42
43
44
45
46
47
48
49
50
51
52
53
54
55
56
57
58
59
60
61
62
63
64
65
66
67
68
69
70
71
72
73
74
75
76
77
78
79
80
81
82
83
84
85
86
87
88
89
90
91
92
93
94
95
96
97
98
99
100
101
102
103
104
105
106
107
108
109
110
111
112
113
114
115
116
117
118
119
120
121
122
123
124
125
126
127
128
129
130
131
132
133
134
135
136
137
138
139
140
141
142
143
144
145
146
147
148
149
150
151
152
153
154
155
156
157
158
159
160
161
162
163
164
165
166
167
168
169
    boolean newTask = false;
boolean keepCurTransition = false;

TaskRecord taskToAffiliate = launchTaskBehind && sourceRecord != null ?
sourceRecord.task : null;

// Should this be considered a new task?
if (r.resultTo == null && inTask == null && !addingToTask
&& (launchFlags & Intent.FLAG_ACTIVITY_NEW_TASK) != 0) {
if (isLockTaskModeViolation(reuseTask)) {
Slog.e(TAG, "Attempted Lock Task Mode violation r=" + r);
return ActivityManager.START_RETURN_LOCK_TASK_MODE_VIOLATION;
}
newTask = true;
targetStack = adjustStackFocus(r, newTask);
if (!launchTaskBehind) {
targetStack.moveToFront();
}
if (reuseTask == null) {
r.setTask(targetStack.createTaskRecord(getNextTaskId(),
newTaskInfo != null ? newTaskInfo : r.info,
newTaskIntent != null ? newTaskIntent : intent,
voiceSession, voiceInteractor, !launchTaskBehind /* toTop */),
taskToAffiliate);
if (DEBUG_TASKS) Slog.v(TAG, "Starting new activity " + r + " in new task " +
r.task);
} else {
r.setTask(reuseTask, taskToAffiliate);
}
if (!movedHome) {
if ((launchFlags &
(Intent.FLAG_ACTIVITY_NEW_TASK|Intent.FLAG_ACTIVITY_TASK_ON_HOME))
== (Intent.FLAG_ACTIVITY_NEW_TASK|Intent.FLAG_ACTIVITY_TASK_ON_HOME)) {
// Caller wants to appear on home activity, so before starting
// their own activity we will bring home to the front.
r.task.setTaskToReturnTo(HOME_ACTIVITY_TYPE);
}
}
} else if (sourceRecord != null) {
final TaskRecord sourceTask = sourceRecord.task;
if (isLockTaskModeViolation(sourceTask)) {
Slog.e(TAG, "Attempted Lock Task Mode violation r=" + r);
return ActivityManager.START_RETURN_LOCK_TASK_MODE_VIOLATION;
}
targetStack = sourceTask.stack;
targetStack.moveToFront();
final TaskRecord topTask = targetStack.topTask();
if (topTask != sourceTask) {
targetStack.moveTaskToFrontLocked(sourceTask, r, options);
} else {
mWindowManager.moveTaskToTop(topTask.taskId);
}
if (!addingToTask && (launchFlags&Intent.FLAG_ACTIVITY_CLEAR_TOP) != 0) {
// In this case, we are adding the activity to an existing
// task, but the caller has asked to clear that task if the
// activity is already running.
ActivityRecord top = sourceTask.performClearTaskLocked(r, launchFlags);
keepCurTransition = true;
if (top != null) {
ActivityStack.logStartActivity(EventLogTags.AM_NEW_INTENT, r, top.task);
top.deliverNewIntentLocked(callingUid, r.intent);
// For paranoia, make sure we have correctly
// resumed the top activity.
targetStack.mLastPausedActivity = null;
if (doResume) {
targetStack.resumeTopActivityLocked(null);
}
ActivityOptions.abort(options);
return ActivityManager.START_DELIVERED_TO_TOP;
}
} else if (!addingToTask &&
(launchFlags&Intent.FLAG_ACTIVITY_REORDER_TO_FRONT) != 0) {
// In this case, we are launching an activity in our own task
// that may already be running somewhere in the history, and
// we want to shuffle it to the front of the stack if so.
final ActivityRecord top = sourceTask.findActivityInHistoryLocked(r);
if (top != null) {
final TaskRecord task = top.task;
task.moveActivityToFrontLocked(top);
ActivityStack.logStartActivity(EventLogTags.AM_NEW_INTENT, r, task);
top.updateOptionsLocked(options);
top.deliverNewIntentLocked(callingUid, r.intent);
targetStack.mLastPausedActivity = null;
if (doResume) {
targetStack.resumeTopActivityLocked(null);
}
return ActivityManager.START_DELIVERED_TO_TOP;
}
}
// An existing activity is starting this new activity, so we want
// to keep the new one in the same task as the one that is starting
// it.
r.setTask(sourceTask, null);
if (DEBUG_TASKS) Slog.v(TAG, "Starting new activity " + r
+ " in existing task " + r.task + " from source " + sourceRecord);

} else if (inTask != null) {
// The calling is asking that the new activity be started in an explicit
// task it has provided to us.
if (isLockTaskModeViolation(inTask)) {
Slog.e(TAG, "Attempted Lock Task Mode violation r=" + r);
return ActivityManager.START_RETURN_LOCK_TASK_MODE_VIOLATION;
}
targetStack = inTask.stack;
targetStack.moveTaskToFrontLocked(inTask, r, options);
targetStack.moveToFront();
mWindowManager.moveTaskToTop(inTask.taskId);

// Check whether we should actually launch the new activity in to the task,
// or just reuse the current activity on top.
ActivityRecord top = inTask.getTopActivity();
if (top != null && top.realActivity.equals(r.realActivity) && top.userId == r.userId) {
if ((launchFlags & Intent.FLAG_ACTIVITY_SINGLE_TOP) != 0
|| launchSingleTop || launchSingleTask) {
ActivityStack.logStartActivity(EventLogTags.AM_NEW_INTENT, top, top.task);
if ((startFlags&ActivityManager.START_FLAG_ONLY_IF_NEEDED) != 0) {
// We don't need to start a new activity, and
// the client said not to do anything if that
// is the case, so this is it!
return ActivityManager.START_RETURN_INTENT_TO_CALLER;
}
top.deliverNewIntentLocked(callingUid, r.intent);
return ActivityManager.START_DELIVERED_TO_TOP;
}
}

if (!addingToTask) {
// We don't actually want to have this activity added to the task, so just
// stop here but still tell the caller that we consumed the intent.
ActivityOptions.abort(options);
return ActivityManager.START_TASK_TO_FRONT;
}

r.setTask(inTask, null);
if (DEBUG_TASKS) Slog.v(TAG, "Starting new activity " + r
+ " in explicit task " + r.task);

} else {
// This not being started from an existing activity, and not part
// of a new task... just put it in the top task, though these days
// this case should never happen.
targetStack = adjustStackFocus(r, newTask);
targetStack.moveToFront();
ActivityRecord prev = targetStack.topActivity();
r.setTask(prev != null ? prev.task : targetStack.createTaskRecord(getNextTaskId(),
r.info, intent, null, null, true), null);
mWindowManager.moveTaskToTop(r.task.taskId);
if (DEBUG_TASKS) Slog.v(TAG, "Starting new activity " + r
+ " in new guessed " + r.task);
}

mService.grantUriPermissionFromIntentLocked(callingUid, r.packageName,
intent, r.getUriPermissionsLocked(), r.userId);

if (sourceRecord != null && sourceRecord.isRecentsActivity()) {
r.task.setTaskToReturnTo(RECENTS_ACTIVITY_TYPE);
}
if (newTask) {
EventLog.writeEvent(EventLogTags.AM_CREATE_TASK, r.userId, r.task.taskId);
}
ActivityStack.logStartActivity(EventLogTags.AM_CREATE_ACTIVITY, r, r.task);
targetStack.mLastPausedActivity = null;
targetStack.startActivityLocked(r, newTask, doResume, keepCurTransition, options);
if (!launchTaskBehind) {
// Don't set focus on an activity that's going to the back.
mService.setFocusedActivityLocked(r);
}
return ActivityManager.START_SUCCESS;
}

首先将newTask变量初始化为false,表示不要在新的任务中启动Activity。由于前面的已经把addingToTask设置为true,因此,这里会执行中间的else if语句,即这里会把r.task设置为sourceRecord.task,即把即将启动的Activity放在原Activity所在的任务中启动。最后,就是调用startActivityLocked函数继续进行启动Activity的操作了

声明: 以上内容拷贝自简书作者jiantao的文章,供自己学习使用

这章是重新梳理插件化技术的整体思路

插件的工程化

插件化技术分为宿主App 和 插件Plugin1这两个 apk,有时候还有 MyPluginLibrary ,宿主和插件都要引用它。

加载插件中的类

宿主App 想要使用 Plugin1 中的类,还使用 宿主App 中的 ClassLoder 是不行的,由此缠身很多种解决方案:

  • 最直接的就是,在反射插件中的类时,使用 Plugin1.apk 对应的 ClassLoader (参考第6章)
  • 无论是宿主还是插件,他们各自的 ClassLoader 都对应一个 dex 数组,把这些插件的dex数组都合并到宿主的 dex 数组中,那么,宿主App就可以加载任何类(参考9.3节)。
  • 自定义一个ClassLoader,取代原先宿主的ClassLoader 。同时在自定义的 ClassLoader 中放一个集合,承载所有插件的 ClassLoader 。那么自定义的 ClassLoader 在加载任何一个类的时候,无论是插件还是宿主的类,都会现在宿主中找,如果没有,再遍历 ClassLoader 集合,看哪个 ClassLoader 能加载这个类(参考9.36节)。

哪些地方可以Hook

关于Hook 的技术可以参考第4章,Hook可以分为三类:

  • 在 App 中使用的类,可以Hook。Android 系统源码中被标记为hide的方法和类,我们可以通过反射使用它们,但是不能Hook。还有一些类,比如 Instrumentation 和 Callback ,在App中也能用,因此可以Hook替换。
  • 实现了接口的类,可以Hook。虽然大部分类和方法都标记为hide,但是只要合格类实现了一个接口,我们就可以借助 Proxy.newProxyInstance 方法去截获它的方法,比较典型的是 IActivityManager 接口,以及实现这个接口的 AMN 。
  • 集合。 没办法Hook一个标记为hide 的类,但是如果Android源码中某个类拥有集合变量的时候,我们可以反射构造出一个对象,然后还是通过反射添加到这个集合中。典型的是,穿件一个 LoadedApk ,把它事先放在 mPackages 缓存中,这样就能直接命中缓存(参考9.2节)。

Activity 的插件化解决方案

从大方向来讲,分为动态替换和静态代理两种:

  • 动态替换:这是“占位”思想。宿主App中声明一个用于占位的 StubActivity ,启动插件中的ActivityA,但是告诉AMS启动的是 StubActivity ,欺骗成功之后,在即将启动Activity时,再把 StubActivity 换回 ActivityA(参考第9章)。
  • 静态代理。这是一种牵线木偶的思想,在宿主App中设计一个 ProxyActivity ,由他来决定启动插件中的哪个 Activity。插件中的Activity都是没有生命的,得在ProxyActivity 生命周期中,调用插件Activity 的生命周期函数(参考9.5节)。

此外,还需要解决 LaunchMode 问题,解决方案参考 9.5 节。

资源的解决方案

资源主要为Activity 服务。主要有两种解决方案:

  • 进入Plugin1 ,则加载Plugin1的资源,反射调用 AssetManager 的 addAssetPath 方法,参数是 Plugin1.apk 的路径。每次进入或者离开插件,都要切换资源。这是一件很繁琐的事情(参考第7章)。
  • 事先把 宿主App的资源以及所有插件的资源都通过 AssetManager 的 addAssetPath 方法添加到一个全局变量中。这样,在插件 Activity 的基类中,重写 Activity 的 getResource 方法,从这个全局变量中提取资源。

针对方案2,由于资源合并到一起,就可能发生资源id冲突,由此产生多种解决方案:

  1. 修改aapt,更改id的前缀(参考15.2节)
  2. 修改resources.arsc,在 aapt 执行完成后,修改生成的文件(参考21章)
  3. 通过 public.xml 固定 plugin1 中所有的资源。这种方案不现实,针对固定一个资源的id还是很好的解决方案。

Fragment是哪个门派

Fragment 与Activity 的最大区别,就是后者的一举一动需要和 AMS 交互,而Fragment不用。这种方案整个应用只有一个Activity ,Fragment 可以在 宿主App 中或者 插件中,只要使用合适的 ClassLoader 加载插件中的类,使用合适的 AssetManager 加载插件中的资源,就是一个完美的解决方案。可以参考 16 章。

Service、ContentProvider 和 BroadcastReceiver 插件化通用方案

因为这三者的数量并不多,插件化中也不会动态新增一个组件,所以最简单的方案是:在 宿主App 的 AndroidManifest 文件中事先声明这些组件。缺点是不能动态新增一个组件。参考 8.1节。

特定于Service 的插件化解决方案

如果不事先在宿主App中声明插件的Service,那么Service 也有自己的解决方案:

  • 动态代理。也是欺上瞒下的思路。Service 不同于 Activity ,一个StubActivity 可以对应多个插件Activity,但是StubService 和插件Service 只能一一对应,所以应该在 宿主App 中声明多个 StubService。参考第10章。
  • 静态代理,牵线木偶思想。创建一个ProxyService,由 ProxyService 来启动插件中的Service,缺点是插件中有几个Service,宿主App 中就要有相同数量的 ProxyService。,参见 14.1和 14.2.
  • 结合前两种,能否在 宿主App中只声明一个Stubservice。参考 14.4

特定于BroadcastReceiver 的插件化解决方案

它的插件化解决方案是把静态的Receiver 转换为动态的Receiver。

特定于ContentProvider 的插件化解决方案

占位思想。宿主App 中由 StubContentProvider 来欺骗 AMS,而实际执行的是 插件中的 ContentProvider 。

Android App 打包流程

早期Android打包都是基于Ant来做,为此我们需要熟悉Android App 打包的每一个过程。随着Gradle的问世,打包简化为几行配置代码。一套完整的Android App 打包流程如下图所示:

Android打包流程图

介绍下各部分的作用:

  • aapt: 为res目录下的资源生成 R.java 文件,同时为AndroidManifest生成Manifest.java文件
  • aidl: 把项目中自定义的aidl文件生成相应的java代码文件
  • javac: 把项目中所有的Java 代码编译成 class 文件。包括3部分: 自己写的代码;aapt生成的代码;aidl生成的Java文件
  • proguard: 混淆的同时生成proguardMapping.txt,这个步骤是可选的
  • dex: 把所有的class文件(包括第三方库的class 文件)转换为dex文件
  • aapt: 这里还是使用aapt,这里是它的另一个功能:打包。即将res目录下的资源、assets下的文件,打包成一个 .ap_ 文件
  • apkbuilder:将所有的dex、ap_文件、AndroidManifest.xml 打包为.apk文件,此时未签名
  • jarsigner: 签名
  • zipalign: 对齐,以便运行时节省内存

资源冲突解决方案一:修改AAPT

插件中的资源id可能会和宿主资源id是同一个值,为了解决资源id冲突,有3中解决方案:

  • 修改打包流程中的aapt命令,为插件资源id指定 0x71 之类的前缀,就可以避免冲突
  • 仍然是将插件资源的id前缀改为 0x71,但是在Android打包生成 resources.arsc 文件后,对这个文件进行修改(具体可见21.2节)
  • 进入到哪个插件,就为这个插件生成新的 AssetManager 和 Resources 对象,使用这两个新对象加载资源,就只能是插件中的资源,永远不会和宿主中冲突(详见 7.2)

修改并生成新的aapt命令

R文件中有十六进制整数变量,内容如下:

1
//代码

这些十六进制的变量,由三部分组成: packageId(apk包id,默认 0x7f) + typeId(资源类型,如attr=0x01,drawable=0x02,还有layout、string等) + entryId(typeId下的资源编码,从0开始递增)。以 0x7f0b006d 为例,packageId 为 0x7f,typeId为 0b,entryId 为 006d。

插件中为防止资源冲突,会为每个插件设置不同的packageId,比如游戏大厅中,斗地主插件可能是 0x71开头,斗牛可能是 0x72。为asset 生成 R 文件 是通过 aapt 完成的,为了实现上述目的,我们要修改 aapt 源码,定位到 Android SDK,找到 aapt 目录,里面有一堆 C 代码, 命令行工具就是用这些代码编译成的,可以在这个目录直接搜索 0x7f,在 ResourcesTable.cpp 中可以找到如下代码:

1
//

在 ResourcesTable 的构造函数中,有一个 Bundle 类型的参数,其次,判断 mPackageType 如果是 App,则都是 0x7f,此外 0x01 和 0x00 都被系统占用了,所以我们不要将这两个值设置为插件的 id前缀(事实上,有些手机厂商会占用其他的一些值,为了保险,我们一般只使用 0x71~0xff 作为插件的前缀)。修改 AAPT 的代码,基本思路如下:

  1. 在 aapt 的命令行参数中传递打包时的前缀
  2. 把这个值设置给 Bundle 实体的 mApkModule 字段,作为 ResourcesTable 的构造函数参数传入
  3. 在 ResourcesTable 构造函数读取 mApkModule 值,也就是前缀值,设置给 packageId

实现代码: 略

在插件化项目中使用新的aapt命令

现在,可以用我们修改的aapt文件替换sdk下的aapt 命令,但是如果这么做,每当Android系统更新,我们都要替换一次aapt命令。一种可行的做法是,我们把这个新的 aapt 工具命名为 aapt_mac ,放到项目的根目录下:

自定义的aapt放置

之后,修改项目中 gradle 文件:

1

上述脚本通过反射,把aapt的路径临时修改为指向当前App根目录下的aapt_mac。此外,我们将App的资源前缀设置为 0x71 ,这样在打包后,R文件中的资源就以 0x71 作为前缀了。

public.xml 固定资源id值

如下场景:多个插件都需要同一个自定义控件,于是我们把这个自定义控件卸载宿主 App,插件调用宿主的Java 代码,使用宿主的资源(有控件肯定有资源)。考虑到App在每次打包后,随着资源的增减,同一个资源id的值可能会发生变化。为避免这种情况,我们可以把公用的资源id值固定写死,如下public.xml文件所示(注意,type和id后面的空格不可省略):

1
2
3
4
<?xml version="1.0" encoding="utf-8">
<resources>
<public type="string" name="string1" id="0x7f050024"/>
</resources>

之后,把public.xml放到 res/values 目录下,R.string.string1 这个资源就会固定成 0x7f050024。当然,还可以指定资源值的一个区间,将上述代码中间那行改成如下代码即可:

1
<public-padding name="my_" end="0x7f02000f" start="0x7f020001" type="drawable"/>

但是从gradle 1.3开始,就忽略 public.xml了,因此需要我们自己使用gradle 脚本来实现,代码如下:

1

之后,打包宿主 ActivityHost1 ,使用Jadx-GUI 查看资源id,可以看到 R.string.string1 的值永远是 2131034148(也即十六进制0x7f050024)。

插件使用宿主的资源

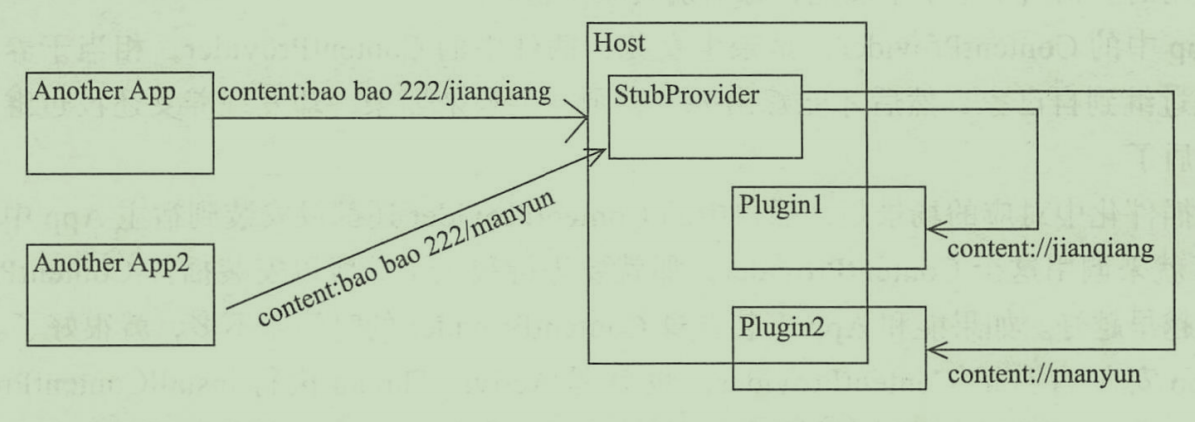
宿主资源值固定了,但是插件怎么访问宿主中的资源呢?如果插件内部能保持一个对宿主项目的引用,那就可以随便访问宿主的任何资源了。我们需要编写gradle脚本,把宿主打包成 jar 包。之后设置插件的gradle文件,通过provided来引用这个jar包。之前介绍过,provided方式引用只在编码时候有用,正式打包的时候不会被引用进去。代码如下:

1

小结

本章给出插件化中资源id冲突的解决方案:

  • 把宿主和插件的资源都合并到一起,通过AssetManager的addAssetPath 来实现。只不过,这种方案会产生资源id冲突的问题
  • 如果不事先合并资源,那就为每个插件创建一个 AssetManager,每个 AssetManager 都是通过反射调用 addAssetPath 方法,把插件资源加进去。当宿主进入一个插件时,就把 AssetManager 切换为 插件的AssetManager ;反之,当从插件回到宿主的时候,再把 AssetManager 切换回宿主的 AssetManager(详见第5章的loadResource方法)。

第一种方案,主要缺陷是资源冲突,并且资源id的前缀是有限的,也就256个值,如果超过256个插件,就要使用方案2了。

ContentProvider基本概念

ContentProvider 就是一个SQLite 数据库,数据提供方A和数据使用方B是通过匿名共享内存来传输数据的。B告诉A,“你把数据写在这个内存地址上”;B准备好数据,写到A要求的内存地址上,A就可以直接使用这些数据了。当数据量非常大的时候,这个数据传递速度是非常快的。

并不是所有数据传递都需要ContentProvider,比如,Activity 跳转时,数据的传递就用的 Binder,一般来说,传输的数据量不超过 1 M 时,使用Binder;否则,此时需要ContentProvider 。

ContentProvider 插件化

前面介绍了 BroadCastReceiver 的插件化解决方案,即把插件中的静态广播都转换为动态广播,然后手动注册到宿主App的广播中。

其实,ContentProvider 也能这么做,这时候不叫“注册”,而叫“安装”。安装当前Apk中所有的ContentProvider 的方法位于 ActivityThread 的 installContentProviders方法中:

1
//代码略

我么你只需要手动执行这个方法,把插件中的ContentProvider 集合作为第二个参数填进去即可。如此一来,我们得到了ContentProvider 插件化的解决方案:

  1. 沿用Activity插件化的第二种方案,将宿主App和插件App的dex合并到一起
  2. 借助PackageParse的parsePackage方法,读取插件中的ContentProvider信息,然后把得到的Package对象转换为我们需要的 ProviderInfo类型对象
  3. 将ContentProvider 的packageName 设置为当前apk的packageName,之后把插件中的 ContentProvider 放入宿主中
  4. 通过反射执行 ActivityThread 的 installContentProviders 方法,把ContentProvider 作为插件的参数,相当于把插件 ContentProvider “安装” 到宿主App中

执行这段Hook代码的时机

ContentProvider 这个组件,往往是提供给外界使用的,如果插件中的ContentProvider 还没安装到宿主App中,第三方就来调用了,那就要等很久了,所以安装插件 ContentProvider 的过程越早越好。App安装自身的 ContentProvider 是在ActivityThread 执行 installContentProviders 方法中,这个方法比Application 的onCreate 要早,但是会晚于 Application 的 attachBaseContent 方法,所以,我们可以在 attachBaseContent 方法中,手动执行 ActivityThread 的 installContentProviders

ContentProvider 的转发机制

让外界App直接调用当前App的插件里定义的ContentProvider ,并不是理想的解决方案。最好的是在宿主App中定义一个 StubContentProvider 作为中转,让外界调用当前App的 StubContentProvider ,然后在 StubContentProvider 中再调用插件里的 ContentProvider:

ContentProvider插件化分发思想

ContentProvider 插件化的精髓在于分发,外界使用 App 提供的 ContentProviderA 时,只知道发送给一个宿主AndroidManifest 中声明锅的 ContentProviderA,而受到请求后,再做二次转发。

Receiver概述

Receiver分为动态和静态两种,简单讨论下区别:

  • 静态广播在 AndroidManifest 中注册,因为Android系统重启时,PMS都会解析App中的AndroidManifest,所以静态广播都存在于 PMS 中
  • 动态广播通过 Context 的registerReceiver 方法最终调用 AMN.getDefault().registerReceiver 方法,所以,动态广播的注册信息存在于 AMS 中

除了注册方式不一样,后续发送和接收的过程就一样了。整个过程简单如下:1、Context 发送广播,最终通过 AMN.getDefault().broadcastIntent,把要发送的广播告诉AMS。2、AMS收到消息后,根据intent-filter 筛选 PMS 和 AMS (即静态广播和动态广播)中符合条件的接收器,通知App进程启动这些广播(调用这些广播的 onReceive)。

动态广播的插件化解决方案

对于动态广播,我们只需要确保宿主App能加载插件中的这个动态广播类就行(因为这里并不需要直接与AMS打交道,只是个类而已)。通过9.3节的dex合并技术,就能做到了。

静态广播解决方案

静态广播无法像Activity那样,即使没在AndroidManifest 中注册也能生效,因为无论是注册还是发送广播,都必须有 IntentFilter,其中的action是可以随意设置的,所以我们对于 Receiver 压根就不能通过类似 Activity 的插桩方式。只有另辟蹊径。

静态广播当做动态广播处理

具体分为两步:

  1. PMS 只能读取宿主 App 的AndroidManifest 文件,读取其中的静态广播并注册。我们可以反射,手动控制PMS读取插件AndroidManifest 中声明的静态广播列表。
  2. 遍历这个静态广播列表,使用 classLoader 加载列表中每个广播类,实例化成一个对象,然后作为动态广播注册到AMS中

静态广播的插件化终极解决方案

上述静态广播当做动态广播的方案,这丧失了静态广播的特性——不需要启动App就可以启动一个静态广播。所以我们仍要探寻如何不启动App也能和插件中的静态广播通信。

回忆一下前面介绍的Activity 和 Service 插件化的占位思想:

  • Activity 只需要一个占位 StubActivity 就能面对大部分插件Activity了,对于LaunchMode 的其他三种形式,则需要更多的占位 StubActivity 应对
  • Service 也需要占位 StubService ,但是一个 StubService 只能对应一个插件中的Service,所以我们需要在宿主App中占位多个 StubService,通过json来配置映射关系。

如果也用占位的思想,每个静态广播需要携带一个或者多个Action,StubReceiver 也不例外,如果 StubReceiver 和插件中的静态广播是一对多的关系,那么从外界发送一个广播到App,就会触发插件中的所有静态广播。由此得出:StubReceiver 和插件中的广播只能是一对一的关系

不过,我们可以为一个广播设置多个Action,这样我们就不需要预先创建很多个StubReceiver用来面对插件中的静态广播了,只需要一个 StubReceiver ,为它配置很多个 action 即可。这样,插件中的静态广播就要和这些 action 建立一对一的关系,还是以前的思路,使用Json配置映射关系就行

还有,AndroidManifest 中支持为每个组件配置 metadata,利用这个特性,为插件中每个静态广播配置对应的 StubReceiver 中的 action ,如下所示:

1
2
3
4
5
6
7
8
9
10
11
12
13
14
15
16
17
18
19
<receiver 
android:name=".MyReceiver"
android:enabled="true"
android:exported="true" >
<intent-filter>
<action android:name=baobao/>
</intent-filter>
<meta-data android:name="oldAction" android:value="jianqiang1"></meta-data>
</receiver>

<receiver
android:name=".MyReceiver2"
android:enabled="true"
android:exported="true" >
<intent-filter>
<action android:name="baobao2" />
</intent-filter>
<meta-data android:name="oldAction" android:value="jianqiang2"></meta-data>
</receiver>

解析插件中的 AndroidManifest 文件,可以借助11.3章节介绍的ReceiverHelper 类的 preLoadReceiver 方法,在遍历插件中的每个静态的 Receiver 时,去除Receiver 的metadata 数据,根据oldAction值,对应到Receiver,比如 MyReceiver 对应 jianqiang1,MyReceiver2 对应 jianqiang2 。

之后,把插件中的Receiver 手动注册为动态广播。宿主中定义的StubReceiver占位广播的作用是分发

这就解决了静态广播的问题,我们可以在App没启动的时候,就启动插件中的静态广播(我其实还是没看懂怎么在没有启动App的情况,就能启动这个静态广播,后续长丝下)。美中不足的是,这个StubReceiver 需要配置很多个 Action 。

Android界的荀彧和荀攸:Service和Activity

根据Context的族谱,Service 是 Activity 的叔叔,结合作用来看,二者有太多相似,但是备份不同,类似三国时期的荀彧和荀攸。不过,二者的区别也挺明显:

  • Activity 是面向用户的,有大量的用户交互的方法,而Service 是后台运行的,生命周期函数很少
  • Activity 中有LaunchMode 的概念,每个Activity启动时都会放在栈顶,根据不同的 LaunchMode 可能会有复用以前的实例或者不复用以前的实例。但是Service不同,同一个 Service 调用多次startService并不会启动多个实例,只会有一个实例,所以,只用一个StubActivity 是应付不了多个插件的Service 的
  • ActivityThread 最终通过Instrumentation 启动一个Activity。而ActivityThread 启动Service 并不借助于 Instrumentation ,而是直接把Service 反射出来就启动了

注意一点,Service 有两种形式: 由 startService 启动的服务;由 bindService 绑定的服务。二者的区别在于:startService 以及对应的 stopService ,就是简单地启动和停止 Service ;bindService 执行时会传递一个 ServiceConnection 对象给 AMS ,接下来 Service 在执行 onBind 时,可以把生成的 binder 对象返回给 App 调用端,这个值存于 ServiceConnection 对象的 onServiceConnected 回调函数的第二个参数中。

预先占位

前面说过,Service 与 Activity 不一样,它只会存在一个实例,所以只用一个StubService 是应付不了多个插件Service 的。考虑到在绝大部分App中Service 数据不会超过10个,所以我们完全可以在宿主App 中创建 10 个 StubService ,StubService1,StubService2…StubService10 ,每个 StubService 只对应插件中的一个Service,如下图:

StubService占位示意

接下来就是让每个插件Service匹配一个宿主中的 StubService 了,有两种匹配方式:

  • 服务器下发一个 JSON 字符串,给出二者的一一对应关系
  • 在每个插件 App 的 assets 目录中,创建一个 plugin_config 配置文件,把这个 JSON 字符串放进去

第2种做法更自然,不需要和服务器交互,json文件解析类似如下代码:

1
2
3
4
5
6
7
8
9
10
11
12
13
14
String strJson = Utils.readZipFileString(dexFile.getAbsolutePath(), "assets/plugin_config.json");

if (strJson == null || TextUtils.isEmpty(strJson)) {
return;
}

JSONObject jobject = new JSONObject(strJson.replaceAll("\r|\n", ""));
JSONArray jsonArray = jobject.getJSONArray("plugins");
for(int i = 0;i< jsonArray.length(); i++) {
JSONObject jsonObject = (JSONObject) jsonArray.get(i);
UPFApplication.pluginServices.put(
jsonObject.optString("PluginService"),
jsonObject.optString("StubService"));
}

我们将 JSON 转化为一个 HashMap ,以插件的类名作为key,以宿主的替身作为value,这个HashMap 存放在宿主App 的 UPFApplication 的 plutinServices 中,是一个全局变量。

startService 的解决方案

Service 的插件化机制和Activity 很像,因为它们是亲戚。我们首先从简单的startService 和 stopService 的插件化做起。

首先,把插件和宿主的dex合并,之前有封装过 BaseDexClassLoaderHookHelper 类,合并后才能随心所欲加载类;其次,采用“欺骗AMS”方法:

1
2
3
//即 Hook AMN 的 gDefault,它是一个Singleton 对象,之后创建它的代理对象 MockClass1 ,然后替换这个字段

//之后,再Hook 到 Handler 类型的 H 类的 mCallback 字段,替换为 MockClass2

主要流程分析一下:

  1. Hook AMN,让 AMS 启动 StubService,这次要拦截的是 startServcie 和 stopService 这两个方法(也即在AMN中就拦截这两个方法,将要操作的目标Service替换成相应的StubService)。不过,这次不再需要把 Intent 缓存了,因为有了 UPFApplication 中的 plutinServices ,我们可以根据插件 Service 找到对应的 StubService,也可以根据 StubService 反向找到 Service

  2. AMS 被“欺骗”之后,它原本会通知App启动StubService,而我们要Hook掉ActivityThread 的 mH 对象的 mCallback 对象,仍然截获它的 handleMessage 方法,只不过这次截获的是 “CREATE_SERVICE” 分支,这个分支执行 ActivityThread 的 handleCreateService 方法。在 handleCreateService 中,并不能获取到 App 发送给 AMS 的 Intent,AMS 要启动那个Service ,这个信息是存在 handleCreateService 方法的 dat 参数中,是 CreateServiceData 类型的。Android系统的实现如下:

1
2
3
4
5
6
7
private void handleCreateService (CreateServiceData data) { 
LoadedApk packageinfo = getPackageinfoNoCheck(data.info.applicationinfo, data.compatInfo);
Service service = null;
java.lang.ClassLoader cl= packageinfo.getClassLoader();
service = (Service) cl.loadClass(data.info.name).newinstance();
//省略无关代码
service . onCreate ();

上面代码中,data.info.name 就是Service 的名称,所以我们只需要将这个值 Hook 为插件的Service即可。至此,一个支持 startService 的插件化框架就完成了。

bindService 的解决方案

有了前面的基础,Service 的 bind 与 unbind 就非常简单了,只要在 AMN 的Hook 中添加一个分支,在 “bindService” 的时候 “欺骗AMS” 就行:

1
2
3
4
5
6
7
8
9
10
11
12
13
14
15
16
17
18
19
20
21
22
else if (”bindService”.equals(method . getName())) { 
//找到参数里面的第一个 Intent 对象
int index = 0;
for (inti= 0; i < args . length ; i++) {
if (args [i) instanceof Intent) {
index = i ;
break;
}
}

Intent rawintent = (Intent) args[index);
String rawServiceName = rawintent.getComponent().getClassName();
String stubServiceName = UPFApplication.pluginServces.get(rawServiceName)
//替换 Plugin Service of StubService
ComponentName componentName =new ComponentName(stubPackage, stubServiceName);
Intent newintent = new Intent();
newintent.setComponet(componentName);
//替换 Intent ,欺骗 AMS
args[index] = newintent ;
Log.d(TAG, ” hook success ");
return method.invoke(mBase , args);
}

这个过程就完成了,接下来就是使用:

1
2
3
4
5
6
7
8
9
10
11
12
13
14
15
16
17
//unbind
btnBind.setOnClickListener(new View.OnclickListener(){
@Override
public void onClick(View v) {
final Intent = new Intent();
intent.setComponent(new ComponentName("jianqiang.com.testservice1"), "jianqiang.com.testservice1.MyService2");
bindService(intent, conn, Service.BIND_AUTO_CREATE);
}
});

//unbind
btnUnbind.setOnClickListener(new View.OnclickListener(){
@Override
public void onClick(View v) {
unbindService(conn);
}
});

看了上面的使用方法,可能会有疑惑了:

  • 上半场,对于unbind行为,为什么不像bind一样在 unbind 的时候做“欺骗AMS”?
  • 下半场,为什么不用在MockClass2中写代码,把StubService2 换回 MyService2?

关于第一个问题,因为我们 unbind 的语法是这样的 unbindService(conn) ,只需要一个 ServiceConnection 类型的参数 conn 即可,这个 conn 在前面的bindService 时用到了,AMS 会根据这个conn 来找到对应的Service,所以并不需要在unbind的时候去做欺骗

第二个问题,这要从Android 系统源码说起,bindService 过程在 AMS通知 App 下半场的流程图如下所示:

bindService过程AMS通知App这下半场

也就是说,bindService 先走114(handleCreateSrvice)分支,再走 121 (handleBindService) ,在 handleCreateSrvice 中已经把我们要启动的 MyService2 放到了 mService 这个集合中了,那么,在 handleBindService 和 handleUnbindService 中,都会从 mService 集合中找到 Service2 。在之前章节,为了解决 createService ,已经拦截了 114 分支把 StubService2 换回了 MyService2 了,所以我们不需要要拦截 121 和 122 了, 无需再MockClass2 添加额外代码。

小结

这里给出Service第一种解决方案——预先占位,在宿主中预先声明若干个StubService。

Activity的插件化需要解决3方面的技术问题:

  • 宿主App可以加载插件App中的类
  • 宿主App可以加载插件中的App资源
  • 宿主App可以加载插件中的Activity

启动没有在AndroidManifest中声明的插件Activity

在5.4节介绍了启动没有在AndroidManifest 中声明的 Activity,借助宿主App中的StubActivity ,在 AMN 中欺骗,在ActivityThread 中欺骗。这种方式的代码如下:

1
//代码可以参见: https://github.com/BaoBaoJianqiang/ActivityHook1

基于动态替换的Activity插件化解决方案

这章节好混乱,压根就没说这里解决的是什么问题

加载插件中类的方案2: 合并多个dex

对LaunchMode的支持

前面介绍的 Activity 插件化技术,对于LaunchMode 都是standard的情况是完全适用的。对于 SingleTop、SingleTask 和 SingleInstance 需要重新考虑。

解决LaunchMode 的问题,适用的还是 占位Activity 的思想,即实现为这3种 LaunchMode 创建很多StubActivity,如下图所示:

占位思想解决LaunchMode问题

我们可以从服务端下载一个Json,指定插件中的Activity 对应哪种 StubActivity ,写Demo的时候,可以直接在本地 Mock 这些数据,保存在 MyApplication 中,然后再 Mock1Class 接货 startActivity 的时候,如果发现要启动的Activity 在 MyApplication 的 pluginActivities 集合中,那就使用这个插件 Activity 对应的占位 StubActivity,代码如下:

1
//代码参见: https://github.com/BaoBaoJianqiang/ZeusStudy1.3

接下来可以测试下。这里有个小bug,无论singleTop还是singleTask,再回到这个Activity时,并不会触发它的onCreate,而是会触发它的onNewIntent(其实这里说的bug我并没有明白,等测试后再说)。为此,我们需要在MockClass2 中,拦截onNewIntent方法,把占位 StubActivity 替换回插件Activity,代码如下:

1
//代码可以参考上面的链接

加载插件中类的方案3:修改App原生的ClassLoader

..

本章介绍一种最简单的插件化方案,适用于四大组件,技术涉及以下3个方面:

  • 合并所有的插件dex,用以解决插件类的加载问题
  • 在宿主AndroidManifest中预先声明插件中的四大组件(插件中的Activity如果很多就很麻烦)
  • 把插件中的所有资源一次性合并到宿主资源中(可能会导致资源id冲突)

在AndroidManifest 中声明插件中的组件

在插件中有啥,在宿主中声明啥就行

宿主App加载插件中的类

把插件dex都合并到宿主的dex中,那么宿主App对应的ClassLoader 就可以加载插件中任意类:

1
2
3
4
5
6
7
8
9
10
11
12
13
//代码参考: https://github.com/BaoBaoJianqiang/ZeusStudy1.0

public final class BaseDexClassLoaderHookHelper {
public static void patchClassLoder(ClassLoader cl,File apkFile,File optDexFile){
//获取BaseDexClassLoder: pathList
Object pathListObj = RefInvoke.getFiledObject(DexClassLoader.class.getSuperclass(), cl, "pathList");

//获取PathList: Element[] dexElements
Object[] dexElements = (Object[])RefInvoke.getFieldObject(pathListObj.getClass(), pathListObj, "dexElements");

...//手敲太难了,到时候复制下
}
}

启动插件Service

根据前面两章,素组App就能启动一个插件中的Service了,代码如下:

1
2
3
4
Intent intent = new Intent();
String serviceName = "jianqiang.com.plugin1.TestService1";
intent.setClassName(this, serviceName);
startService(intent);

加载插件中的资源

四大组件都可以这样实现插件化方案,Service 、ContentProvider 和 Receiver 都只要合并dex就够了,他们没有资源的概念。Activity严重依赖资源,所以必须解决插件中的资源问题。前面章节介绍了AssetManager 和 Resources ,AssetManager 有个 addAssetPath 方法,可以一次性把插件的路径都“灌进去”,然后根据这个“超级” AssetManager 生成一个“超级” Resources ,以后无论是查找插件还是宿主的资源,都能通过这个“超级”Resources 找到了。上述实现如下:

1
//代码参考:  https://github.com/BaoBaoJianqiang/ZeusStudy1.1

至此,Activity 的“傻瓜式”插件化解决方案就完成了,我们甚至可以从插件Activity跳转到宿主中的Activity,但是这个方案有以下两个问题:

  • 插件的四大组件都必需先在宿主中声明,不能新增
  • 插件和宿主的资源都合并到一起,资源id可能会有冲突

Activity 与资源是一对孪生兄弟,想彻底解决Activity 插件化,就要面对如何使用插件中资源的问题。

资源加载机制

资源分类

Android资源分为两类:

  • 第一类是res目录下存放的可编译资源文件,编译时,系统会自动在R.java中生成资源文件的十进制值,这种访问比较简单,只需要获取Resources对象,进而通过Resources的getxxx即可得到资源
  • 第二类是assets目录下存放的原始资源文件,因为apk在编译的时候不会编译它们,所以我们也不能通过 R.xx 来访问,通过绝对路径呢?也不行,因为apk不会解压到本地,所以我们无法直接获取,只能通过AssetManager类的open方法去获取,类似如下代码:
1
2
3
Resources resources = getResources();
AssetManager am = getResources().getAssets();
InputStream is = getResources().getAssets().open("filename");

由此可见啊,Resources 就能搞定一切!

剪不断理还乱:Resources 和 AssetManager

AssetManager 中有一个 addAssetPath(String path) 方法,App启动时,会把当前的Apk路径穿进去,接下来AssetManager 和 Resources 就能访问当前apk的所有资源了。addAssetPath 方法是不对外的,不过我们可以通过反射的方式,把插件apk的路径传入这个方法,就把插件资源添加到一个资源池了,当然,当前App的资源早已经在这个池子中了。App有几个插件,就调用几次addAssetPath ,把插件资源都塞到池子里。

apk打包时,每个资源都会在R文件中有一个十六进制值,并且会生成一个 resources.arsc 文件,它是一个 Hash 表,存放着每个十六进制值和资源的对应关系,这样在运行时,就能知道十六进制值对应res目录下哪个目录哪个资源。

资源插件化解决方案

以 在宿主App 中读取插件里面的字符串资源 为例,说明这个解决方案,总共会分为 4 个步骤:

  1. loadResources 。通过反射,创建 AssetManager 对象,调用 addAssetPath 方法,把插件 Plugin1 的路径添加到 AssetManager 对象中,从此,这个AssetManager 就只为这个插件 Plugin1 服务了。在这个 AssetManager 基础上,创建相应的 Resources 和 Theme 对象。
  2. 重写 Activity 的getAsset ,getResources 和 getTheme 方法,它们的思路都是一样的,如果插件的对象中相应的对象为空,则使用默认的,即类似: if(mAssetManager == null) { return super.getAssets(); }
  3. 加载外部的插件,生成这个插件的对应的 ClassLoader:
1
2
3
4
5
File extractFile = this.getFileStreamPath(apkName);
dexPath = extractFile.getPath();

fileRelease = getDir("dex", 0);//0代表Context.MODE_PRIVATE
classLoder = newDexClassLoader(dexPath, fileRelease.getAbsolutePath(), null, getClassLoder());
  1. 通过反射,获取插件中的类,构造出插件类的对象 dynamicObject ,然后就可以让插件中的类读取插件中的资源了。
1
2
//整个章节的示例代码可以参考: https://github.com/BaoBaoJianqiang/Dynamic2

换肤

在学习了插件化编程后,换肤其实是可以把图片放到插件App中,然后生成R文件来动态读取这些资源:

因为前面已经讲过原理,所以这里暂且不表

1
//示例代码可以参考: https://github.com/BaoBaoJianqiang/Dynamic3.2

这是第二部分【解决方案】的第一章

加载外部dex

加载外部dex主要有3个步骤:

  1. 从服务器下载插件 apk到手机 sdcard(需要sdcard权限)
  2. 读取插件apk中的dex,生成对应的 DexClassLoader
  3. 使用DexClassLoader 的loadClass 方法读取插件 dex 中的任何一个类

在理解原理的时候,可以把插件App放在主App的 assets 目录中,用于替代从服务器下载插件。

接下来的部分是例子演示,这里不表。

插件的瘦身

在插件化编程过程中会出现某个moudule在测试的时候需要,但是在正式环境中不需要,因此,可以把这个module打包成jar包,之后使用provided引用:

provided files(“lib/classes.jar”)

因为关键字provided只支持jar包,而不支持module

Application 的插件化解决方案

在插件中可能自定义Application,插件会在这个自定义的Application的onCreate中做一些初始化工作,但我们知道插件的Application是没机会执行的,此时,我们可以在宿主的自定义的Application的onCreate方法中,手动把这些插件Application都反射出来,执行他们的onCreate,不过这样一来,插件Application就是没有生命周期的,它彻底沦为一个普通类。

1
2

//示例代码参见: https://github.com/BaoBaoJianqiang/ZeusStudy1.8